 English
 русский
 Español
Content
- 1 Understanding the Fundamentals of Thin Line Staples
- 2 Top Applications for Thin Line Staples in Modern Projects
- 3 Choosing the Right Thin Line Staple for Your Task
- 4 Optimizing Your Tool: Staplers for Thin Line Staples
- 5 Advanced Techniques and Professional Tips for Flawless Results
- 6 Exploring Niche Uses and Creative Applications
Understanding the Fundamentals of Thin Line Staples
In the world of fastening and joining, the humble staple plays an indispensable role across countless industries and applications. Among the diverse array of staple types, the thin line staple has carved out a unique and critical niche. Characterized by its slender crown and fine gauge legs, this fastener is engineered for precision, minimal intrusion, and holding power in delicate or space-constrained environments. Unlike bulkier staples designed for heavy-duty construction, thin line staples are the go-to solution for tasks where visibility, material integrity, and a clean finish are paramount. Their design minimizes splitting in fragile materials and reduces the visible footprint of the fastening point, making them ideal for applications ranging from fine woodworking and cabinetry to upholstery and craft projects. Understanding the specific geometry—crown width, leg length, and wire gauge—is essential to selecting the right staple for the job and avoiding common pitfalls like insufficient hold or material damage.
Defining the Geometry: What Makes a Staple "Thin Line"
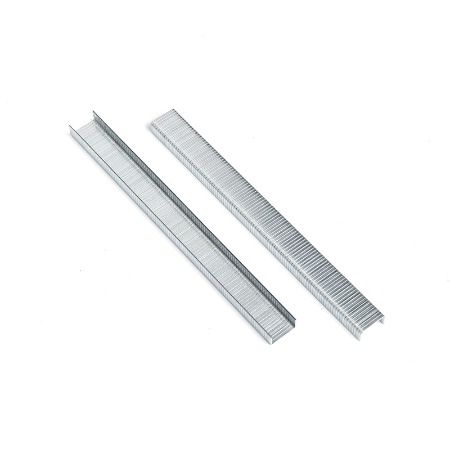
The term "thin line" primarily refers to the crown of the staple. A standard staple might have a crown width of ¼ inch or more, whereas a thin line staple typically features a crown width of 3/16 inch or even ¼ inch but is defined by its finer wire gauge. The crown is the horizontal bridge that connects the two legs, and a thinner crown means less surface area contacting the material being fastened. This is a double-edged sword; it reduces the chance of splitting wood along the grain and leaves a less noticeable mark, but it also means reduced holding power compared to a wider crown staple. Therefore, thin line staples are often deployed in greater numbers to distribute the holding force. The legs are also a crucial component, usually fashioned from a finer gauge wire (e.g., 20 or 21-gauge) compared to the 16 or 18-gauge used in heavier staples. This finer gauge allows for easier penetration into hardwoods and manufactured boards without pre-drilling.
The Evolution and Material Science Behind Modern Staples
The development of the thin line staple is a story of material science meeting practical necessity. Early staples were simple, cut from basic steel wire and prone to rust and failure. Modern thin line staples, however, are products of significant engineering. They are commonly manufactured from high-carbon steel wire, which is drawn to precise tolerances to achieve the required thinness without sacrificing tensile strength. This wire is then formed, cut, and finished with specific coatings to enhance performance. The most common finishes include galvanization (zinc coating) for corrosion resistance, which is essential for staples that might be exposed to moisture either during their application (e.g., in furniture that will be glued) or in their final environment. Other materials, such as stainless steel, are used for applications requiring ultimate corrosion resistance, though at a higher cost. The precision in manufacturing ensures that staples feed reliably in pneumatic or electric staplers, preventing jams and ensuring consistent depth of drive, which is critical for a professional finish.
Top Applications for Thin Line Staples in Modern Projects
The versatility of the thin line staple is best demonstrated by its wide range of applications. Its primary advantage—discreet yet strong fastening—makes it invaluable in fields where aesthetics are as important as function. One of the most common uses is in the assembly of furniture and cabinetry. Here, these staples are used for attaching thin backing panels, securing corner blocks, fastening dust covers to the underside of cabinets, and even in some types of mitre joint reinforcement. Their thin profile prevents the hardwood or plywood from splitting, which is a constant risk with wider-crown staples. Another significant application is in upholstery. When attaching fabric to wooden frames, a bulky staple can create an unsightly lump or even puncture through certain fabrics. Thin line staples provide a secure hold while remaining largely invisible under the fabric and padding. Furthermore, they are extensively used in the manufacturing of picture frames, small wooden boxes, and other craft items where traditional fasteners like nails would be too visible or likely to cause damage.
Securing Cabinet Backings and Thin Panels Effectively
One of the most frequent and critical uses for thin line staples is in the attachment of cabinet backings, which are often made from thin plywood, hardboard, or even Masonite. These materials are prone to warping and can be easily split by a fastener that is too large or applied with too much force. The best thin line staple for cabinet backing is one that has a leg length just sufficient to penetrate the cabinet frame without protruding through the other side. For most applications, a ⅜-inch or ½-inch leg length is ideal. The fine gauge, typically 20 or 21, allows the staple to pierce the backing material and sink into the solid wood frame without causing splits. When compared to using small nails or brads, staples offer significantly faster application with a pneumatic stapler and provide two points of contact per fastener, increasing resistance to pull-out and preventing the backing from rattling loose over time. This makes them a superior choice for both production environments and DIY projects.
Delicate Trim Work and Molding Installation
While brad nails are often the first choice for trim work, thin line staples offer a compelling alternative in many scenarios, especially for securing thinner, more flexible trim or for temporary holding during glue-up. Their key benefit is speed and holding power. A staple gun can fire staples in rapid succession, making it efficient for long runs of quarter-round or shoe molding. The challenge is that the crown, though thin, is still wider than a brad nail head. Therefore, their use is often limited to areas that will be concealed by caulk and paint. For instance, when installing a thin veneer molding or a delicate screen bead, a thin line staple can provide the necessary hold without the risk of the nail "peening" over or bending during installation. The selection of the correct leg length is paramount to avoid blow-out on the face of the trim. For most thin trim, a ⅜-inch leg length is the maximum that should be used.
Choosing the Right Thin Line Staple for Your Task
Selecting the appropriate thin line staple is not a one-size-fits-all process; it requires careful consideration of the material, the tool, and the desired outcome. A poor choice can lead to project failure, material damage, or tool jamming. The first and most critical factor is compatibility with your stapler. Staplers are designed to accept a very specific size and gauge of staple. Using an incompatible staple can damage the tool and is a safety hazard. Once compatibility is confirmed, the next step is to consider the material you are fastening. For hardwoods, a sharper, harder staple is necessary to ensure clean penetration. For softer woods and manufactured boards like particleboard or MDF, a standard staple will suffice, but care must be taken not to over-drive it, as this can compromise its holding power. The length of the staple's leg must be chosen to provide maximum holding power without causing blow-out on the opposite side of the workpiece. A good rule of thumb is to choose a leg length that penetrates into the base material by approximately two-thirds of its thickness.
Key Selection Criteria: Gauge, Length, and Coating
The performance of a thin line staple is dictated by three primary characteristics: wire gauge, leg length, and material coating. The gauge refers to the thickness of the wire. A lower gauge number indicates a thicker wire (e.g., 16-gauge is thick, 21-gauge is thin). For fine work and delicate materials, a higher gauge number (thinner wire) like 20 or 21 is preferred. Leg length determines the depth of penetration. Shorter legs (e.g., ¼" or ⅜") are for very thin materials, while longer legs (e.g., ½" or ⅝") are for securing thicker materials to a substate. The coating affects durability and application. Galvanized staples resist rust and are suitable for interior use where moisture might be present from glue or environmental humidity. For exterior applications or high-humidity interiors (like bathrooms), stainless steel staples, though more expensive, are the only choice to prevent unsightly rust stains and fastener failure over time.
Comparison of Staple Characteristics for Different Tasks
The following table provides a clear comparison to guide your selection process, helping you match the staple properties to your specific project needs.
| Project Task | Recommended Gauge | Recommended Leg Length | Recommended Coating | Reasoning |
|---|---|---|---|---|
| Upholstery Fabric to Wood Frame | 21-gauge | ⅜" | Plain or Galvanized | Fine gauge prevents fabric damage; length is sufficient for frame penetration without protrusion. |
| 1/4" Hardboard Cabinet Backing | 20-gauge | ⅜" or ½" | Galvanized | Provides stronger hold than 21-gauge; length penetrates backing and firmly into cabinet frame. |
| Thin Wood Trim (1/2" thick) | 20-gauge | ⅜" | Galvanized | Balances holding power with minimal risk of blow-out on the visible face of the trim. |
| Craft Projects (Balsa, Thin Plywood) | 21-gauge | ¼" or ⅜" | Plain | Ultra-fine gauge minimizes splitting in very delicate materials; short length prevents protrusion. |
| Outdoor Furniture (Upholstery/Trim) | 20 or 21-gauge | As required | Stainless Steel | Stainless steel provides complete corrosion resistance against weather elements. |
Optimizing Your Tool: Staplers for Thin Line Staples
To effectively and safely use thin line staples, you must have the right tool for the job. The market offers a range of staplers, from manual hand-operated models to pneumatic and electric versions. Pneumatic staplers, powered by an air compressor, are the professional's choice due to their high speed, consistent driving power, and reliability. They allow for rapid-fire operation, which is essential for large projects like upholstering multiple chairs or assembling numerous cabinets. Electric staplers, either corded or battery-powered, offer excellent portability and are a great option for those who do not have an air compressor. They are generally quieter than pneumatic tools but may have a lower rate of fire. Manual staplers are sufficient for very small, infrequent projects but are labor-intensive for anything more. A key consideration for any stapler is depth adjustment. A good stapler will have an easy-to-use dial or lever that controls how deeply the staple is driven into the material. This is crucial for achieving a flush finish without damaging the surface.
Pneumatic vs. Electric: A Detailed Comparison
Choosing between a pneumatic and an electric stapler is a common dilemma for many craftsmen and DIY enthusiasts. The decision hinges on factors like project volume, workspace, and budget. Pneumatic tools require a significant initial investment in a quality air compressor and hose, but the tools themselves are often less expensive, more powerful, and lighter than their electric counterparts. They are the undisputed champion for high-volume, continuous use in a workshop setting. However, they are tethered to the compressor, limiting mobility. Electric staplers provide complete freedom of movement and are ready to use as soon as they are plugged in or powered up. They eliminate the need for a compressor, reducing noise and setup time. Modern battery-powered models are incredibly capable, though they can be heavier due to the battery and may have a slower driving speed. For a hobbyist working on various projects around the house, an electric stapler is often the more practical and versatile choice.
Advanced Techniques and Professional Tips for Flawless Results
Mastering the use of thin line staples involves more than just pulling the trigger. Professional results come from technique and an understanding of how the staple interacts with the material. One of the most important techniques is sequencing. When attaching a panel, start by fastening the corners to align the piece, then work towards the center from opposite sides to prevent warping or buckling. Always ensure the stapler is held squarely against the work surface; angling the tool will cause the staple to enter at an angle, reducing holding power and potentially damaging the material. Test your staple depth and power on a scrap piece of the same material before starting on your actual project. This allows you to adjust the air pressure or depth setting to achieve a perfectly flush staple without sinking it too deep. For critical visible areas, you can use a staple punch to sink the crown slightly below the surface and then fill the indent with wood putty before finishing.
Troubleshooting Common Stapling Problems
Even experienced users encounter issues. Understanding how to troubleshoot these problems is key to maintaining efficiency.
- Staples not driving flush: This is usually caused by incorrect depth adjustment or insufficient air pressure. Increase the air pressure slightly or adjust the depth control dial on your tool. Also, check that you are using the correct staples for the tool model.
- Staples jamming: Jams are often caused by using damaged, low-quality, or incorrect staples for the tool. Always use high-quality, manufacturer-recommended staples. Keep your tool clean and lubricated according to the manual's instructions.
- Staples bending on impact: This indicates that the staple is hitting a knot or an area of harder material, the air pressure is too low, or the driver blade in the tool is worn. Try increasing air pressure slightly or pre-drilling pilot holes in exceptionally hard woods.
- Material splitting: If your material is splitting, your staple leg length may be too long for the thickness of the material, or the staple gauge may be too thick. Switching to a finer gauge thin line staple with a shorter leg can often solve this problem.
Exploring Niche Uses and Creative Applications
Beyond their traditional roles in woodworking and upholstery, thin line staples have found a home in a variety of niche and creative applications. Their discreet nature makes them perfect for museum display and picture framing, where they are used to secure dust covers on the back of frames and to fasten canvases to stretcher bars without distracting from the artwork. In the realm of model building, particularly for architectural models or detailed dioramas, these tiny fasteners can be used to assemble delicate structures where glue alone is insufficient. Some creative hobbyists even use them in textile arts for securing heavy fabrics or in making rustic signs where a hidden fastener is desired. The common thread in all these applications is the need for a strong, reliable, but nearly invisible fastening method. The thin line staple gun for delicate projects is, therefore, an essential tool in the arsenal of not just carpenters, but also artists, designers, and conservators.
Beyond Wood and Fabric: Unconventional Materials
While designed for wood and fabric, thin line staples can sometimes be used on softer, unconventional materials with careful testing. For example, they can be used to secure thin plastic sheets or vinyl mesh to wooden frames for greenhouse panels or screen doors. The key is to ensure the material is backed by something solid and that the staple's penetration is carefully controlled to avoid tearing the plastic. Another application is in securing certain types of insulation batting. However, caution is always advised. Materials that are too brittle, like some plastics, may crack upon being stapled. It is always imperative to conduct a test on a scrap piece to evaluate the result before committing to the entire project.


")


